
Bloom From The Center With A Mixed Media Gratitude Mandala
What if your thank-you notes could bloom into art?
What if the moments you're most grateful for became petals, patterns, and playful shapes in a radiant mandala?
This project is an invitation for you to pause, create, and celebrate your life in color.
A gratitude mandala isn’t just a pretty circle. Think of it as a symbolic practice of centering, expanding, and honoring the small joys that make life feel full. Whether you’re a seasoned art journaler or just now cracking open a fresh page, this mixed media project is an easy, soul-nourishing way to turn your gratitude into visual magic.
Suggested Items For This Project
∙Art journal or sturdy mixed media paper ∙ Circle-making tools (compass, stencils, bowls, plates) ∙ Black pen or fine liner ∙ Colored pencils, markers, or watercolors ∙ Collage scraps (magazine clippings, old book pages, washi tape) ∙ Glue stick or matte medium ∙ Optional: pressed flowers, gold leaf, metallic pens, thread, fabric, stamps, or anything you love
Step-by-Step: Mixed Media Gratitude Mandala
❥ Step 1: Find Your Center
Draw a circle in the middle of your page to anchor your mandala. In this space, write a word or phrase that sums up what you’re most grateful for right now.
* You don’t have to use words if you don’t want to. A symbol, shape, or color swatch that evokes a feeling is just as powerful.
❥ Step 2: Create the First Ring
Using soft pencil lines or stencils, draw the first ring around your center. In this ring, begin to layer small expressions of gratitude. You can write tiny notes, glue down images that spark joy, or doodle symbolic shapes.
* Sun On My Skin, Laughing With My Sister, or Morning Coffee
* Add a cut-out of your favorite flower or a color that reminds you of your favorite place.
* Doodle tiny stars, birds, vines, or waves.
❥ Step 3: Keep Building Outward
Continue creating new rings around your center, adding more mixed-media elements as you expand. Try alternating between:
∙Written gratitudes ∙Collaged textures ∙ Painted or inked pattern
Let your materials guide you. One ring might be all watercolor dots. Another could be a spiral of gold ink or a fan of fabric pieces.
Reminder:
There’s no wrong way to build your mandala. You don’t have to be precise or symmetrical. Follow your intuition. Let your mandala grow the way your gratitude does, freely, imperfectly, beautifully.
❥ Step 4: Add Layers of Meaning
Once your outer rings begin to form, take a moment to sit with the mandala. What’s showing up? Are there repeating shapes or themes? Can you layer a translucent element (like vellum or tissue paper) and write over it?
Try:
∙Stitching with embroidery floss around the rings
∙Adding a “hidden” message underneath a flap
∙Writing an affirmation along a spiral path like:
“I am surrounded by beauty. I am rooted in grace. I bloom with joy.”
❥ Step 5: Seal It with a Blessing
Finish your mandala by placing your hand gently in the center. Take a breath and offer a blessing for all that you’ve named, all that you’ve felt, and all that’s still unfolding.
Sample Blessings
Gentle Blessing
Thank you for all that is, all that was, and all that will be. May this mandala be a mirror of joy, a circle of peace, and a reminder that I am held in love.
Empowered Blessing
With every mark I’ve made, I honor my journey. With every word I’ve written, I claim my power. May this creation ripple outward and bless everything I touch.
Grounded Blessing
As this mandala blossoms from center to edge, so too does my gratitude. May this circle echo the cycles of nature and remind me to return again and again to what matters most.
Mystical Blessing
By moonlight and morning, by ink and intention, I seal this sacred circle. May it shimmer with unseen magic and whisper reminders to stay open, soft, and thankful.
Short & Sweet Blessing
This is enough. I am enough. Thank you, thank you, thank you.
A Template to Create A Personalized Blessing
I bless this mandala with ___, in honor of ___, and with gratitude for ___. (Example: I bless this mandala with calm, in honor of my healing, and with gratitude for the quiet moments that held me.)
You can leave your mandala open or frame it, tuck it into your altar, or return to it over time and add more as your gratitude expands.
You’re Allowed To Be A Rebel!
Your mandala doesn’t need to be round. It doesn’t need to stay inside the lines. It doesn’t need to look like mine or anyone else’s.
This is your sacred creative expression. If you want to:
∙Make it square- GO FOR IT!
∙Use only one medium - PERFECT!
∙Turn it into a series over a week - AWESOME!

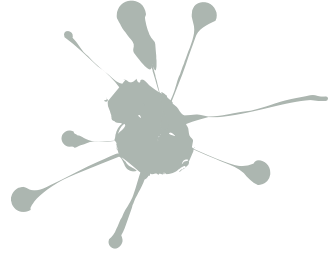
A mandala from magazine collage to mixed media with ink markers and gratitude notes added!


Art is a form of prayer. Gratitude is your ink. Let the two dance.